

Introduction
Aaaaaages ago, I posted a Note about timeline plotting and asked if y'all would like me to write a post about my method. The thing is, I realized that in order to talk about it, I'd first have to tell you about the main method to which I added the new one. So that's why we're here today, to talk about what started it all.
Let's proceed!

Pre-Chaptering.
More commonly called outlining.
At some point in my journey as a fiction writer, I came up with a fantastic idea to plan my novels and not miss a single detail of the plot. I didn't know it was a technique that had been used before because I was a sheltered homeschooler, so I gave it my own name: pre-chaptering. Even without prior context, it is quite easy to decipher the meaning of this invented word.
The tools I use and the method I employ aren't very “fancy” or elaborate; it's simple, almost primitive. However, it's effective and has helped me quite well so far. I've had to modify it a couple of times—add this here, remove this there—but overall, I think my pre-chaptering thing is like writing a book. First, you bring it into existence, that first draft filled with scratches and ideas scattered everywhere. Then comes the second draft, where you bring order to the chaos. And finally, the third draft, which is mostly about polishing the details and enhancing their natural beauty.
I'm not sure at what stage I would place my method, but I think it's advanced enough that with a few explanations and a pinch of logic, you'll be able to understand it.
Without further ado, let's get to it.
You will need:
A computer
Microsoft Word/Google Docs
And your creativity
Note: I made a special template for this occasion. It'll help you get a visual/mental idea of how I do the process, so you'd better take a look at it before continuing to read this post. I'm afraid you wouldn't understand a cucumber otherwise.
Title and: ………… (or whatever you wanna call it)

Clearly you don't need an explanation about what kind of information to put there, but see that line of dots highlighted in red? It serves several purposes. First, the color in which they're highlighted indicates the book's current status (in progress, editing, ready to be published, or whatever). I will talk about the meanings of the colors later.
Second, whether I'm using Microsoft Word or Google Docs, I select the dots and make a comment, in which I usually put this information:
Writing start date.
Writing completion date.
Location of events (i.e., the place where your story takes place, even if it’s fictional)
Any other extra information related to the above.
I have a weakness for dates. I literally collect dates just because I like the sound of them or how they look written, so I like to keep track of the exact date I start writing a book and when I finish it. The same goes for each chapter. But you don't have to do that because it's just a fetish of mine.
The only thing I would consider necessary would be to highlight the dots with the appropriate color and, if necessary, the location of the events in a comment.
Chapter numbering
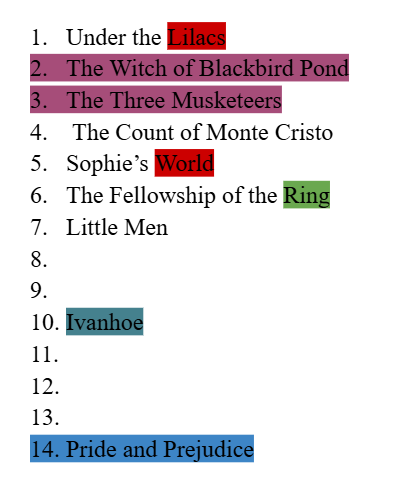
I don’t give chapter numbers; I give titles to the numbers. If that makes sense.
I don’t always have a clear idea of how many chapters I’m going to write, but most of the time I have an estimate, so one of the first and most essential things I do for pre-chaptering is to make a vertical list of numbers. Like an index, but without the titles.
Some of my books don’t ask for chapter titles, like Rouge. Or if you’ve read Ivanhoe, you’ll know what I’m talking about; chapters don’t have titles. In these cases, I simply type CHAPTER and that’s it. On the other hand, if it’s a book that asks for chapter titles, but I don’t have one yet, I also just write CHAPTER or a keyword that indicates something specific about the chapter’s outcome.

If I have no idea what the chapter—for example, eight—, will be about, I leave the space after the number completely blank, as you can see in the image above.

Once I have the chapter title, I add a comment to the last word and then begin summarizing all the necessary details for that chapter. I always start by writing "Start Date:," "Finish Date:," and "Word Count:," even if I don't have that information yet, as I'll get it later. But as I mentioned before, the part about keeping track of important dates is because I have a fetish for dates, so it’s not essential for you if you don’t feel like doing it.
But now, what comes after the date and word count data?
Well, I just start writing a summary of what will be written in that chapter. Sometimes I only need a few lines, and sometimes I write more than 500 words. I guess it depends on each particular case.

Most of what I write in the FACTS section ends up in the respective comments for each chapter. Or if not, at least it helps me brainstorm and not forget anything. I may use it later or I may discard it, it all depends on what the circumstances require.
I always try to go in order, you know, plan chapter 1, then 2, then 3, etc., etc. But sometimes I come up with something that could happen around chapter 6, and that’s when I jump to number 6 in the vertical list of numbers—even if there’s nothing at all between 6 and 2—, write the title of the chapter or just CHAPTER, make a comment, and start writing the summary.
With practice, it becomes easier to jump from one chapter to another; from five to eleven, from eleven back to three; from eight to sixteen and back to ten. This way, I can plan the end even if I don’t have the beginning. Or I can plan the climax even when I have no idea what the beginning will be or what will trigger the climax. In short, the basic concept of pre-chaptering is to tie together loose ends with the help of a “template” of numbers and colors, until everything, or at least most of it, makes sense.
Color code
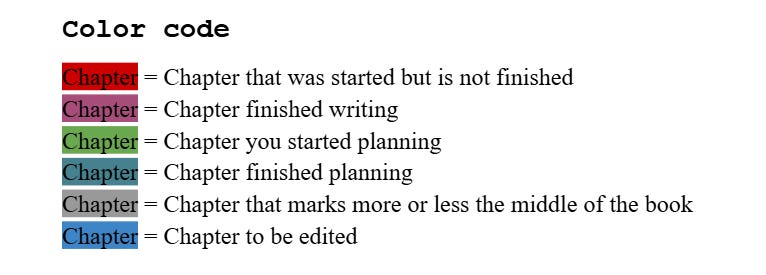
There's not much to say about the color code once you analyze the image above. I usually only mark the last word of a started chapter in red, as shown in the template. With purple, which means a completed chapter, I highlight everything from the chapter number to the entire chapter title.

But again, this is how I like to do it. You can tweak it however you like—you can even change the colors, their meanings, add more colors, or delete others if you wish. Do it however you like; just remember to write down the meanings of your colors somewhere, or you might forget, and I'm not sure you want to deal with the mental confusion that could cause.
Improvisations
“Improvisations” is basically a section in my WIP file where I write down those random scenes I don't always know where to put. “ANOTHER MATTER” is what I use to mark where a scene begins and ends.
What's in parentheses can be any kind of information that reminds me or gives me an idea about the context of the scene. For example, “Chapter 3.” That way, I know the next scene belongs in Chapter 3, even if I don't know exactly where in Chapter 3 it falls. It could also be something like "when Tommy falls and breaks his leg." The possibilities are endless; it all depends on what the situation calls for.
The improvisations section used to always go at the end; it was the last thing in my WIP file. That way I wouldn't get confused or get things mixed up. But recently I decided to move that section to my Pre-chaptering file. So now I work with two files per book:
Pre-chaptering + Improvisations
The WIP, full chapters, text or whatever you want to call it
I found that doing it this way made the work cleaner and less confusing. Therefore, it increased the speed with which I could move forward. It also helps me get a more accurate idea of the word count.
And then there are the famously numerous drafts, of course, but that's a horror story for another time.
Background Music
What’s a 21st-century writer without their playlists?
I absolutely love creating playlists to fit each phase of my writing process, and here’s the one I created for Pre-Chaptering. As you can see, it’s very short. And yes, I love Vivaldi, his Four Seasons really help me focus, especially Autumn and Winter. Anyway, just some inspiration, just in case.
Especial Mention and Farewell
Shoutout to Kaiden Anderson for teaching me how to take screenshots on my laptop!
I wish I could tag him, but he's no longer on Substack, so we'll have to settle for mentioning his name and giving him credit. Until a few weeks ago, I didn't know how to take screenshots on my new laptop, and now that I know how, I've become slightly addicted to taking screenshots all the time. This very post proves it.
Anyway, as you can see, in conclusion, my method is based on numbers, color + meaning, and comments. A list of numbers with titles, highlighted in colors indicating their status, and a comment on each title providing essential details about the chapter. Easy, simple, and effective.
That being said, I hope this post has been of some use to you. Let me know if you have questions or suggestions! And, while I can't give an approximate date, much less a specific one, I promise I'll eventually return with the timeline plotting post. I really, really hope it doesn't take too long. But we shall see.
Thanks so much for reading, see you next time!
Behind the letters,

I love this system, it's so organised! For my current WIP I did write a detailed outline of the story and planned the events of each chapter, but that was just in a notebook without a planned system. And I always have a document called 'SCRAPS' where I keep all the random facts/deleted scenes/etc, but it is very chaotic. So maybe I will take inspiration from this post and organise my planning better!
I LOVE your system tho! It makes it feel so much more manageable